
Our Design
Design Requirements
Mechanical:
-
Support 10 lbs: The boat should be able to hold the box which is made of glass, circuits and whatever amount of trash that our boat can hold.
-
Buoyant force must be at least 5 lbs greater than 10 lbs
-
Chassis should not be over 10 lbs
-
Can tow 10 lbs of waste before needing new net
-
Motor can reach speed of 1.5 knots or around 0.75 m/s
-
Center bridge should be able to withstand being turned on its side without a bend of greater than 0.05 inches. This will be tested using the bend equation for a beam supported at both ends.
Electrical:
-
Runs on 9 Volts: all electronics should be efficient and be able to with 9 volts.
-
Batteries last one hour on full power:
-
Solar panels for extra support: The solar panels are there for supporting the battery so that the battery life can last longer.
-
Controlled wirelessly up to 100 yards away: This will allow the movement of the boat being controlled by someone off shore.
-
Motors go a max of 50,000 rpm: This ensures that the boat can go quick if needed and go slow when picking up trash.
-
Wind sensor: The wind sensor will help us understand what harsh weather our boat can go into. Depending on the results we get, the boat may be able to operate in hurricane like conditions.
-
Control should be simple with less than three buttons/joysticks to operate: The controller allows for motors to be controlled by up and down joysticks. These joysticks can be used for making the boat go forwards, backwards, or turning the boat if one motor is on and the other isn’t. The last button is for turning off and on power.
Environmental:
-
IP67 waterproofing: Able to withstand being submerged one meter below water for 30 minutes. This will be modeled by creating perfect seals between parts that would be epoxied together and a rubber casing for the electrical components.
-
Should be able to operate in all reasonable temperatures - 0 to 100 deg F.
-
Salt Water Corrosion Prevention: This is necessary as the boat would be used in salt water oceans for cleanup. What needs to be protected is metal components. How we would almost ensure protection from salt water is by first limiting the amount of metal used in the first place in exposed areas and for exposed metals we would use anti-corrosion coatings. This would be used on the metal clips that connect to the net, screws, and brackets. As well we would opt for stainless steel for the necessary metal components.
-
Sand Abrasion: In order to protect the surface of the boat from sand and other small debris floating in the water we would be using a painted protective coat on the outside of the hull to prevent damage.
Design Alternatives and Process
-
Our first iteration contained the idea of a 3D printed base that would make the boat float. This idea was soon voted out as it was easier and more efficient to buy pvc pipes.
-
When we first found PVC pipes, they did not come with a lid so we found cone lids, but these were ruled out as we found flat lids.
-
We wanted a z bracket but when we went to home depot we did not find any Z brackets. To make this work we found L brackets that we screwed the middle together to make Z brackets.
-
We then screwed in the 1 foot by 1 foot plexiglass we found from the ITLL to form the middle of the boat. This would have held the Arduino components.
-
The last design that we altered was the hooks on the back, to clip the net in place. We put hooks and we glued them on to the boat but we had to completely redo them in the CAD part and they didn’t look the same as before. However they were better because they would hold the net safer than the clips we had bought.
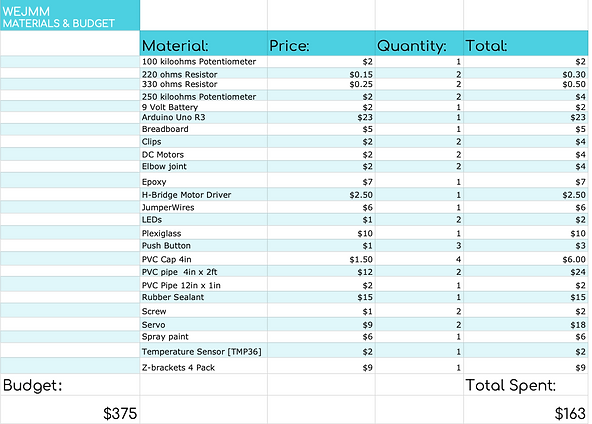
Budget/Materials

WEJMM's complied list of materials and budget is listed. This includes all that was used for the CAD & TinkerCad models. The initial budget consisted of $375 , in which WEJMM was able to make a physical model, this having an impact on the budget. Another area of spending was electronics, in which the price was extracted from the TinkerCAD models. The final spendings only summed up to $163.
WEJMM having about
57% of the budget unused.
Timeline
Initial Timeline:
-
March 10: Preliminary boat design
-
March 19: Boat assembled (w/out electrical) and items ordered
-
April 2: Electrical Components working and Waterproofed
-
April 7: Pond testing completed and results documented
-
April 16: Class presentation
-
April 23: Any improvements or patchwork completed
-
April 24: Design Expo
Second Timeline:
-
March 29: CAD boat chassis complete
-
March 30: OnShape models complete
-
March 31: Have all OnShape models together (assemble the boat)
-
April 1: Start working on Website
-
April 2: TinkerCAD motor model complete
-
April 3: TinkerCAD controller complete
-
April 7: Boat motor mount complete with working motor on CAD
-
April 12: Have Website completed
-
April 24: Design Expo